Showing posts with label Tips and Tweaks. Show all posts

Saturday, July 19, 2008

Download with BearFlix

Downloading videos is something of an obsession with many netizens. However, slow download times can be daunting. BearFlix is the fastest video download application on the Web offering access to millions of video titles, all free. BearFlix is powered by the same engine as BearShare, but optimized from the ground up for video download. BearFlix is 100% clean, with no adware, no spyware, no viruses, no trojans. Just pure video downloads.
BearFlix roars out of the cave with swarming, hashing, fast downloads and a video player, but hibernates when confronted with proxies. Sometimes there are issues with proxies. The configuration process is very easy and the toolbar and icon interface is simple and easy to use. If you are an advanced user then you can take advantage of the configuration options. BearFlix almost configures itself, and its toolbar and icon interface is geared toward novices. (Configuration options help advanced users suit the program to taste.)

Based on the popular BearShare, and connected to the Gnutella network, this utility is optimized for video files. Simply enter a search term, and find files immediately. As with all P2P networks, there's no guarantee the files are available, accurately named, or virus-free. However, BearFlix's file-rating option helps users self-police spam off the network. It is safe to use and will not affect your computer with adware, spyware, viruses or trojans. All you get is great videos.

Although downloads were fast, system memory used was considerable. In the freeware version there is a banner ad and slightly slower download speeds. Advanced users will note configuring BearFlix is easy but will be disappointed the program lacks proxy server support. Novice peer-to-peer users will find BearFlix a great entry-level P2P program, but most users will prefer an application geared to files of all types.


Key features:

  • BearFlix is optimized client for fast download of video files
  • Connect to more sources and download video faster
  • Find more free video files with a 'deep search' mechanism
  • Reliable free downloads - automatic resume mechanism
  • Improved user interface, designed for Video downloads
  • Video specific media player
  • Automatic Virus protection
  • Configurable Parental controls
  • Easy to use, just install, and GO!
  • Download videos online for free!
----------------------------------------------------------------------------------------------------------------

Friday, June 20, 2008

Simple tweaks to speed up Windows XP

If you’re running Windows XP, chances are your computer has gotten gradually slower over the time period you’ve been using it. So here i am providing some simple tweaks through which one can speed up the overall performance of Windows XP.
1. Uninstall And Remove Unnecessary Programs And Files

There’s no need to keep all of those games you’ve beat, demo’s you’ve downloaded, trial programs you’ve neglected, or even programs you use to use. It doesn’t matter if you have a 1 TB hard drive, clean it up.

Go to Start -> Control Panel -> Add Remove Programs. Removing old programs is easy. You can safely remove programs like games, demos, and other software you no longer use. If you are not sure what a program is... don't delete it just yet. You can do an internet search to find out more about any mystery programs installed on your PC to decide to delete them or not.


2. Delete TEMP & Cache Files and Directories

Temporary files aren’t something you can do without, but they’re definitely something you need to keep an eye on. These can take up a decent amount of hard drive space and slowdown Windows XP’s access to your hard drive.

Go to Start -> Programs -> Accessories -> System Tools -> Disk Cleanup. Check on "Temperory Files" then click OK. Another method is to type "temp" in Run command and then delete everything that appears there.


3. Defragment All Hard Drives

When you install/uninstall or add/delete programs and files onto your hard drive, sometimes fragmented files can be left behind. This clutters your hard drive, making it more difficult for Windows XP to access it quickly along with taking up unnecessary space.

Go to Start -> Programs -> Accessories -> System Tools -> Disk Defragmentor. Select the drives and run it.


4. Disable File Indexing

This indexing service gets info from files on the hard drive and creates a "searchable keyword index." If you don't use the XP search feature often to look for documents, you can turn this feature off, and the difference you'll notice is a slight increase in the time it takes for your computer to find a file, but an overall increase in general speed for everything else.

Go to My Computer -> right-click on the C: Drive -> Properties. Uncheck "Allow Indexing Service to index this disk for fast file searching" and then click OK. Now select "Apply changes to C:\, sub folders and files" and click OK.


5. Disable Windows Animations / Visual Effects

It’s safe to assume that by now you’re no longer excited by the beautiful minimize animations or any of the other fading and sliding effects that Windows XP offers. Your operating system may not look as shiny as it use to, but you’re interested in performance, not a butterfly mouse cursor.

Go to Start -> Control Panel -> System -> Advanced tab. In the "Performance" section select "Settings". Then select "Adjust for best performance". Personally, I only have 3 items checked in through custom settings: "smooth edges of screen fonts", "use common tasks in folders", and "use visual styles on windows and buttons". You can uncheck all of them if you like. But, just getting rid of all the animated features will help the responsiveness of your PC.


6. Remove unused Fonts

Having too many fonts can really slow down how fast programs start up. Some people have more than 500 fonts installed on WinXP, but I personally try to keep the number of fonts below 200. The less you have the faster your programs that use them (office software, graphic programs etc..) will load.

Go to Start -> Control Panel -> Fonts. You can delete the fonts you don't use here. Remember to keep the basic fonts like Verdana, Arial, Times, Trebuchet, Courier, serif, sans-serif, Georgia, etc... along with any fonts you like or related to your business.


7. Speedup Folder Browsing

You may have noticed that everytime you open my computer to browse folders that there is a slight delay. This is because Windows XP automatically searches for network files and printers everytime you open Windows Explorer. To fix this and to increase browsing significantly, remove this task.

Go to My Computer -> Tools menu -> Folder Options -> View tab. In that uncheck the "Automatically search for network folders and printers" check-box. Click OK then Reboot your computer.

8. Detect and Repair Disk Errors

Over time, your hard disk develops bad sectors. Bad sectors slow down hard disk performance and sometimes make data writing difficult or even impossible. To detect and repair disk errors, Windows has a built-in tool called the Error Checking utility. It’ll search the hard disk for bad sectors and system errors and repair them for faster performance.

Go to Start -> My Computer. In My Computer right-click the hard disk you want to scan and click Properties -> Tools tab -> Check Now. Select the "Scan for and attempt recovery of bad sectors" check-box. Click Start.


9. Optimize Your Pagefile

You can optimize your pagefile. Setting a fixed size to your pagefile saves the operating system from the need to resize the pagefile.

Right click on My Computer and select Properties. Select the Advanced tab. Under Performance choose the Settings button. Select the Advanced tab again and under Virtual Memory select Change. Highlight the drive containing your page file and make the initial Size of the file the same as the Maximum Size of the file.

10. Perform a Boot Defragment

There’s a simple way to speed up XP startup: make your system do a boot defragment, which will put all the boot files next to one another on your hard disk. When boot files are in close proximity to one another, your system will start faster.On most systems, boot defragment should be enabled by default, but it might not be on yours, or it might have been changed inadvertently.

To make sure that boot defragment is enabled: Run the Registry Editor. Go to HKEY_LOCAL_MACHINE\SOFTWARE\Microsoft\Dfrg\BootOptimizeFunction. Set the Enable string value to Y if it is not already set to Y. Exit the Registry. Then Reboot.

---------------------------------------------------------------------------------------------------------------

Saturday, June 14, 2008

Windows Run Commands

Wanted to Browse fast in windows. Remember these commands. This will really save a lot of time of your. There are many commands which you might have never seen or never knew. To invoke the Run box, hold down the Windows key and hit R (or from the Start Menu, choose "Run.") From there type any one of the keywords listed to launch an app: like calc for Calculator or clpbrd for the Clipboard Viewer or freecell for the card game.There are certain properties of windows which you hardly know exist in windows. Here is a list of 1o8 run commands that i know.

Windows Run Commands :
  1. Accessibility Controls------- access.cpl
  2. Add Hardware Wizard------- hdwwiz.cpl
  3. Add/Remove Programs------- appwiz.cpl
  4. Administrative Tools------- control admintools
  5. Automatic Updates------- wuaucpl.cpl
  6. Bluetooth Transfer Wizard------- fsquirt
  7. Calculator------- calc
  8. Certificate Manager------- certmgr.msc
  9. Character Map------- charmap
  10. Check Disk Utility------- chkdsk
  11. Clipboard Viewer------- clipbrd
  12. Command Prompt------- cmd
  13. Component Services------- dcomcnfg
  14. Computer Management------- compmgmt.msc
  15. timedate.cpl------- ddeshare
  16. Device Manager------- devmgmt.msc
  17. Direct X Control Panel (If Installed)*------- directx.cpl
  18. Direct X Troubleshooter------- dxdiag
  19. Disk Cleanup Utility------- cleanmgr
  20. Disk Defragment------- dfrg.msc
  21. Disk Management------- diskmgmt.msc
  22. Disk Partition Manager------- diskpart
  23. Display Properties------- control desktop
  24. Display Properties------- desk.cpl
  25. Display Properties (w/Appearance Tab Preselected)------- control color
  26. Dr. Watson System Troubleshooting Utility------- drwtsn32
  27. Driver Verifier Utility------- verifier
  28. Event Viewer------- eventvwr.msc
  29. File Signature Verification Tool------- sigverif
  30. Findfast------- findfast.cpl
  31. Folders Properties------- control folders
  32. Fonts------- control fonts
  33. Fonts Folder------- fonts
  34. Free Cell Card Game------- freecell
  35. Game Controllers------- joy.cpl
  36. Group Policy Editor (XP Prof)------- gpedit.msc
  37. Hearts Card Game------- mshearts
  38. Iexpress Wizard------- iexpress
  39. Indexing Service------- ciadv.msc
  40. Internet Properties------- inetcpl.cpl
  41. IP Configuration (Display Connection Configuration)------- ipconfig /all
  42. IP Configuration (Display DNS Cache Contents)------- ipconfig /displaydns
  43. IP Configuration (Delete DNS Cache Contents)------- ipconfig /flushdns
  44. IP Configuration (Release All Connections)------- ipconfig /release
  45. IP Configuration (Renew All Connections)------- ipconfig /renew
  46. IP Configuration (Refreshes DHCP & Re-Registers DNS)------- ipconfig /registerdns
  47. IP Configuration (Display DHCP Class ID)------- ipconfig /showclassid
  48. IP Configuration (Modifies DHCP Class ID)------- ipconfig /setclassid
  49. Java Control Panel (If Installed) jpicpl32.cpl
  50. Java Control Panel (If Installed)------- javaws
  51. Keyboard Properties------- control keyboard
  52. Local Security Settings------- secpol.msc
  53. Local Users and Groups------- lusrmgr.msc
  54. Logs You Out Of Windows------- logoff
  55. Microsoft Chat------- winchat
  56. Minesweeper Game------- winmine
  57. Mouse Properties------- control mouse
  58. Mouse Properties------- main.cpl
  59. Network Connections------- control netconnections
  60. Network Connections------- ncpa.cpl
  61. Network Setup Wizard------- netsetup.cpl
  62. Notepad------- notepad
  63. Nview Desktop Manager (If Installed)------- nvtuicpl.cpl
  64. Object Packager------- packager
  65. ODBC Data Source Administrator------- odbccp32.cpl
  66. On Screen Keyboard------- osk
  67. Opens AC3 Filter (If Installed)------- ac3filter.cpl
  68. Password Properties------- password.cpl
  69. Performance Monitor------ perfmon.msc
  70. Performance Monitor------- perfmon
  71. Phone and Modem Options------- telephon.cpl
  72. Power Configuration------- powercfg.cpl
  73. Printers and Faxes------- control printers
  74. Printers Folder------- printers
  75. Private Character Editor------- eudcedit
  76. Quicktime (If Installed)------- QuickTime.cpl
  77. Regional Settings------- intl.cpl
  78. Registry Editor------- regedit
  79. Registry Editor------- regedit32
  80. Remote Desktop------- mstsc
  81. Removable Storage------- ntmsmgr.msc
  82. Removable Storage Operator Requests------- ntmsoprq.msc
  83. Resultant Set of Policy (XP Prof)------- rsop.msc
  84. Scanners and Cameras------- sticpl.cpl
  85. Scheduled Tasks------- control schedtasks
  86. Security Center------- wscui.cpl
  87. Services------- services.msc
  88. Shared Folders------- fsmgmt.msc
  89. Shuts Down Windows------- shutdown
  90. Sounds and Audio------- mmsys.cpl
  91. Spider Solitare Card Game------- spider
  92. SQL Client Configuration------- cliconfg
  93. System Configuration Editor------- sysedit
  94. System Configuration Utility------- msconfig
  95. System File Checker Utility (Scan Immediately)------- sfc /scannow
  96. System File Checker Utility (Scan Once At Next Boot)------- sfc /scanonce
  97. System File Checker Utility (Scan On Every Boot)------- sfc /scanboot
  98. System File Checker Utility (Return to Default Setting)------- sfc /revert
  99. System File Checker Utility (Purge File Cache)------- sfc /purgecache
  100. System File Checker Utility (Set Cache Size to size x)------- sfc /cachesize=x
  101. System Properties------- sysdm.cpl
  102. Task Manager------- taskmgr
  103. Telnet Client------- telnet
  104. User Account Management------- nusrmgr.cpl
  105. Utility Manager------- utilman
  106. Windows Firewall------- firewall.cpl
  107. Windows Magnifier------- magnify
  108. Windows Management Infrastructure------- wmimgmt.msc
Also provide me with other commands than these that you know in your comments. That will add to my knowledge and it will really help me a lot, since i believe in using direct commands rather than browsing.
----------------------------------------------------------------------------------------------------------------

Friday, June 13, 2008

Browse Flickr photos through TAG GALAXY

While exploring internet today (my usual timepass when i got no work), i came across this amazing site Tag Galaxy. Tag Galaxy is an application to explore Flickr photos via virtual planetary systems. You enter a tag, and the related galaxy appears on screen.

TagGalaxy offers up a novel concept concerning Flickr and tags. The set up, as you can probably guess, is influenced by space. Essentially, Flickr tags are visualized as an arrangement of planets. The greater number of pictures within a tag category, the larger the planet will be. To start off, you simply have to enter a search term or tag into the search bar; you could enter a color, objects, a city name, etc. After you click go, you’re taken off to space, following large glowing orbs and planets. The initial effect is quite visually arresting; and it gets better. From there, click on any planet to zoom in and your planet will fill up with Flickr photos. Also, you can scroll the mouse for zooming in the planet filled with Flickr images. Click on any of these to get a larger view. To view even more photos, hit the arrows at the top and your planet will be tiled with more photos. There’s also a full screen mode, so you can enjoy the spectacle even more. To start a new search, hit ‘new tag’. You’ll be able to enter in a new term and zoom in on more galaxies.

Honestly, you can search on Flickr just as easily, but there is something insidiously addictive (which might sound bad, but it’s really, really good) about this method. I simply could not get enough clicking - clicking on planets, spinning them, rotating them on their axis, and finally playing with the pictures contained inside. The only negative thing I found to the whole experience is that it does appear to slow down some after a lot of play.

So now, discover a new way of searching images on the internet with Tag Galaxy. Enter your favorite tag or keyword and see what images and other tags are related in this stunning visualisation. This is what i tried with a tag of my name "Yogesh". And see how many images it shown related to this tag! (No pics of mine though !!!)

-------------------------------------------------------------------------------------------------------------------------------------------------------------

Thursday, June 12, 2008

Powerpoint to video converter

So the topic is related to converting powerpoint presentations to video formats. But then the question arises "Why would one need this". Well what i have observerd is that usually people face technology handicaps to shoot and share a video. However, making a powerpoint presentation is quite easy. There are already 500mn powerpoint users. People can make a video out of their powerpoint presentation and can upload the same on youtube or ipod or put it in blog or on a website. The biggest advantage is that you can burn the video on to a DVD and watch the presentations on a large TV screen.

There are a number of softwares that converts PPT to various video formats. Personally i prefer videos in AVI format as they are smaller in size comparatively. So i will be giving here methods to convert PPT into a AVI video file.


PowerPoint presentation to AVI format
  • The first method is to play slideshow on your screen and to record it at the same time with screen recording application like Wondershare DemoCreator. But I want to suggest one thing regarding screen recorder that while conversion you will not be able to do any other job and you need to open PowerPoint each time. Also there are chances of loosing animation, audio tracks etc. One more disadvantage is that you cannot convert all PowerPoint pieces at same time.
  • The Second method is using software available on various website. You can find lots of software application for PowerPoint conversion to AVI and also promising of providing best quality output. But you need to find the best one, so our suggestion is to take free trail prior to purchase.

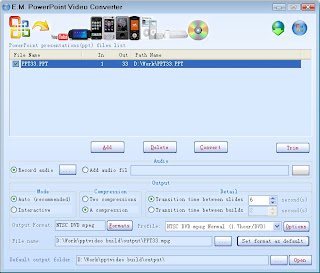
Although there are a number of softwares for PPT-Video conversion, very few of them are for FREE. The E.M. PowerPoint Video Converter is what i prefer for free conversion tool.

E.M. PowerPoint Video Converter

E.M. Free PowerPoint Video Converter is FREE and all-in-one PowerPoint to video converter. It can convert PowerPoint presentations to AVI, MPG, WMV, BMP images and MP3 audio.


Main Functions:

  • Two output mode(Auto/Interactive), Two compression mode(two compressions/a compression), Two run mode(slide/build), you can high-quality, simple, rapid convert PowerPoint file.
  • Support the output video formats: AVI, MPEG, WMV.
  • Extract and Convert PowerPoint file audio to MP3 audio.
  • Convert PowerPoint presentations to BMP mage sequences.

Key Features:
  • Support PowerPoint 2000 / 2002 / 2003 / 2007.
  • It could provide the best capability to convert PowerPoint files to other video formats.
  • Batch conversion.
  • Support attach other audio track (MP3/WMA/WAV).
  • Customizable video crop and pad for exported video.
  • Customizable trim.
  • Easy to use.

Other Features:
  • Integrate a powerful media player - Total Video Player.

File Formats Supported:

Video Formats:
  • PowerPoint (ppt) to WMV (.wmv)
  • PowerPoint (ppt) to Ms Mpeg4 AVI (.avi)
  • PowerPoint (ppt) to MPEG1 (.mpg)

Audio Formats:
  • PowerPoint (ppt) to MPEG audio(.mp3)

Image Formats:
  • PowerPoint (ppt) to BMP (.bmp)
-------------------------------------------------------------------------------------------------------------------------------------------------------------

Saturday, June 7, 2008

Shortcuts for Microsoft Word

Here’s a list of Microsoft Word keyboard shortcuts that are being used by experts for years. Word is amazing powerful and if you become well-versed in using the shortcuts, you can really save yourself a lot of time having to move your hand to your mouse in order to right-click or highlight text.

Now, the really easy shortcuts like copy and paste are not given here assuming you have used Word many times before reading this post!

  • CTRL + S
You might say “Well that’s one of those stupid ones!”, but it’s actually not! Many people do not save their documents quickly and easily using this shortcut! It would have saved many people's lots of crying or frustration! Don’t go to File and then click Save, it’s a waste of time! It is particularly helpful when computer shuts down or turn-off accidently (due to whatever reason).

  • CTRL + A
Will select all of the text in the document. This is very useful when you have to change the font type or size for the entire document. You can use this one in combination with the others, such as CTRL + D to bring up the Font Format menu.

  • CTRL + SHIFT + LEFT ARROW
This one allows you to select the last word you typed. This is useful if you messed up the last word and want to quickly re-type it without having to press backspace. You can keep pressing the arrow to select more words to the left.

  • ALT + CTRL + F
Adds a footnote at the current position of the cursor. Very useful when writing papers and having to cite your sources. At the end of the line, type the shortcut and the superscript will be created and you’ll be moved down to the bottom section where you can write your source info.

  • F7
Starts up the proofing engine, which checks your spelling and grammar. No need to keep right-clicking on each red line! Then engine will go through all of the mistakes in the current document.

  • CTRL + 1, 5, or 2
Pressing CTRL and then one of these numbers will automatically space the paragraph to either single (1), 1.5 (5) or double-space (2). You can use this one in conjunction with CTRL + A to double-space your entire doc.

  • CTRL + =, CTRL + SHIFT + =
Quick and easy way to go into subscript and superscript mode, respectively. Otherwise, you have to go through the Font dialog box, etc and that’s a real pain!

  • SHIFT + F7
You can’t live without that thesaurus these days! You can use this one with CTRL + SHIFT + LEFT ARROW to highlight the word you just wrote and then bring up the thesaurus on the selected word!

  • CTRL + K
Will either take your highlighted text and make it into a hyperlink or will allow you to create your own hyperlink from scratch.

  • ALT + CTRL + M
Adds an annotation to your current text position. Great if you’re adding comments or notes to a document, then you don’t have to use the toolbar.

  • CTRL + M
Indents the paragraph by half an inch. Good for quotes or hierarchical outlines.

  • CTRL + P, F2
Brings up the print dialog box. F2 will bring up the Print Preview.

  • CTRL + L, E, or R
Aligns the line of selected text to the left, center, or right of the screen.

  • F4
Repeats the last action performed. Very very useful when you have to change the same thing in multiple locations. Do it once and then press F4.

  • Alt + F4
Close the Word program. Will prompt if you have not saved the file.

So start using some of the shortcuts and you’ll find things work a lot faster! It takes some time to get used to, but it’s worth it. The best way is to disconnect your mouse and force yourself to use keyboard shortcuts. Enjoy!
------------------------------------------------------------------------------------------------------------------------------------------------------------------

Friday, June 6, 2008

Boost the voltage of Intel Core 2 Duo


What is overclocking?


Overclocking is pushing your CPU to run at a faster clock speed than the manufacturer has it set at.


Lets Get started!

The first step is to enter your BIOS. To do this, boot up your computer and while it begins to post hit the Delete key.

There are two main ways people go about overclocking. The first way is by increasing your FSB by 10mhz at a time and running Orthos and monitory temps, and increasing voltage when needed.

So you've decided to overclock that Core 2 Duo processor you have. Issue is, even with all the proper overclocking software and the right heat prevention gear for your components, your processor still can't output the necessary voltage to get this thing started. Instead of simply throwing away your motherboard and buying a new one, through using a variation on the "pin-mod" overclocking technique, you can easily alter the voltage with just some electrical tape and conductive ink.

The Core 2 Duos bring the joy back for the Intel Overclockers with their easy to handle heat and ample of overclock head-room. However, the overclocking capacity depends as much on the motherboards paired with them. Some of the enthusiasts on a tight budget are stuck with a limiting motherboard , particularly in the voltage department. Well now here's a way out for you!

Until recently, your only option would have been to buy a new motherboard due to limits set on the voltage output. Now, through using a variation of the tried and true “pin-mod” technique, you’ll be able to bump your voltage up from using just two tools: electrical tape and conductive ink. This mod will work on nearly all of the Core 2 Duo CPU’s by connecting a few points with the conductive ink. In the past, these points where actually “pins” that you would simply bridge within the motherboard seating to achieve a similar overclock in voltage, but without them there, the process of overclocking becomes a lot easier.

You can basically over-ride the default voltage of 1.35v inherent on many of the Intel Core 2 Duo, E6300 to X6800, with a simple "pin-mod". Well yes, there are no longer pins on these LGA packaged precessors... in fact that makes them easier to modify! All you need is some electrical insulation tape and some conductive ink!

**As some CPUs come with a different default voltages such as 1.2875v, etc, using these mods will get you different results so I will be updating with more info for CPUs with different default voltages. For now, this is for 1.35v default.**


  • Overclock to 1.4v: You will need to connect the two pins together at row three, column’s six and seven.

(To get a slight bump to 1.4v, simply connect the 'pins' shown above with conductive ink. This is a direct representation of your Processor and not your motherboard socket, do take note!)


  • Overclock to 1.45v: You will need to connect two pins together, along with covering a third pin. Connect the pins together at row’s two and three, column four. Place a pin sized piece of tape over the pin at row four, column four.


  • Overclock to 1.5v: You will need to connect two sets of pins together, along with covering a fifth pin. The first set of pins are row’s two and three, column four. The second set of pins are row three, column’s six and seven. Place a pin sized piece of tape over the pin at row four, column four.


  • Overclock to 1.55v: You will need to connect the two pins together at row’s two and three, column four.


  • Overclock to 1.6v: You will need to connect two sets of pins together, the first at row’s two and three, column four. Then connect the second set at row three, column’s six and seven.


To facilitate precision, tape over the surrounding 'pins' except the ones you are trying to connect. For example, as shown below for overclocking to 1.4v


*NOTE* This tutorial/tweak is only the first draft. I'm sure it has plenty of errors. Please point them out in your comments as you see them, and I will make changes. Thanks !

----------------------------------------------------------------------------------------------------------------------------------------------------------------------


Speed-Up loading of Adobe Acrobat Reader

Don’t you often get irritated when your acrobat reader takes 5/10 seconds to load when you want to open a pdf document?

Here is The way to speed up the loading.

1. Go to the installation folder of acrobat reader
Most of the times its C:\program files\adobe\acrobat\reader\... whatever

2. Move all the files and folders from the “plug_ins” directory to the “Optional” directory.
(Just… cut and paste the files NOT copy & paste).

  • Make sure that acrobat reader is not open else it will lock the files and not allow you to move the files.

Now run your acrobat reader, the adobe installer will run once to apply the changes you made and then your acrobat reader will load very fast and almost as fast as notepad.

-------------------------------------------------------------------------------------------------------------------------------------------------------------

Friday, May 23, 2008

Gigaget Ultra-fast Download Manager

Want to improve your downloads speed?
Gigaget (developed by Giganology) is the next generation download manager which utilizes cutting-edge Net Grid technology by one order of magnitude with files mirrored on several sites that improves your download speed up to 7-10 times and sometimes can speed up downloads up to 20 times!

Gigaget Download Manager utilizes p2sp (Peer-to-Peer and servers) technology that improves your download speed by 7-10 times. Safe and easy to use, manage, powerful task manager. More than fast auto data integrity validation and correction, import/export download list.

Gigaget is the next generation download manager that utilizes cutting-edge Net Grid technology. Net Grid Technology taps the unused resources of networked PCs and servers, allowing content providers to deliver large files with faster speed and at a fraction of the cost of traditional solutions.

Gigaget Download Manager also has Unique Error Diagnosis function, to help users find the reasons and solutions on failed tasks. Other feature is Intelligent Prompt System, providing useful information and suggestions for each specific situation. Advanced intelligent functions, and intelligent prompt system. Version 1.0.0.23 may include unspecified updates, enhancements, or bug fixes.


Features:

  • Ultra-fast download speed experience
  • Auto data integrity validation and correction
  • Import/export download list, easy to share with friends
  • Compatiable with major browsers-Internet Explorer, Mozilla/Firefox, Maxthon
  • Major streaming protocol support, including MMS/RTSP/Flash
  • Intelligent Web Analysis, helping you find the URL (out of a web page) to download
  • Intelligent Disk Cache system which protects your hard disk from high-speed download
  • Intelligent Prompt System, providing useful information and suggestions for each specific situation
  • Unique Error Diagnosis function, helping users find the reasons and solutions on failed tasks

Detailed Information:

-------------------------------------------------------------------------------------------------------------------------------------------------------------